The Non Exam Assessment
For your NEA you will create a substantial programming project. This will give you the opportunity to advance your programming and software development skills.
The Report |
Structuring your report. |
|
You will produce a report which includes the the stages of software development outlined below. Each section includes an explanation and the OCR marking grid.
|
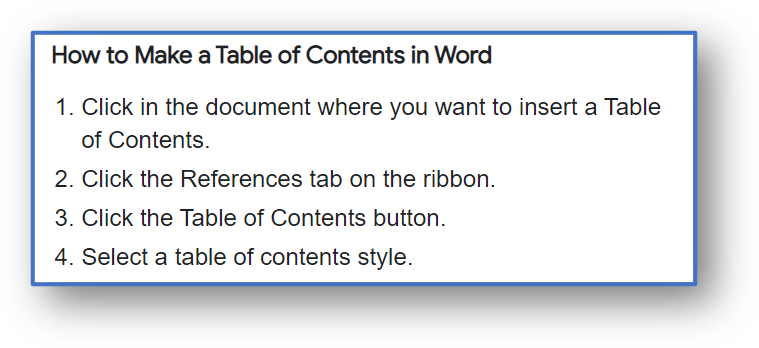
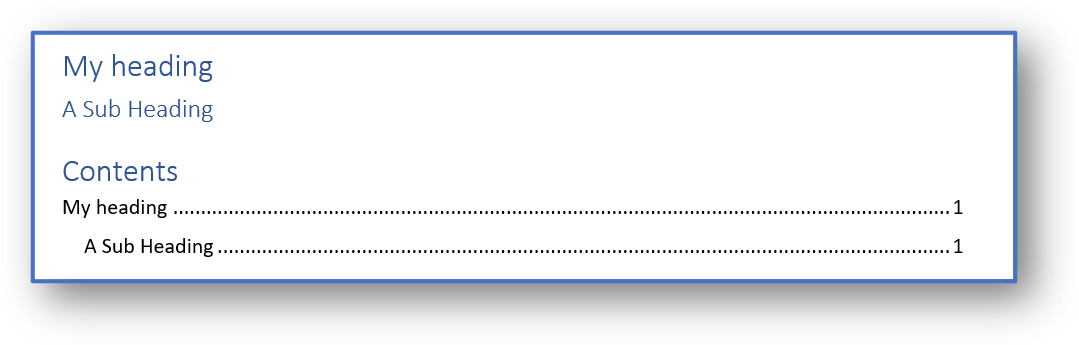
You need to structure your report so that it is easy for an examiner to find each section. You can create an automated table of contents in Word. You must format your text using the built-in headings, sub headings etc.
|
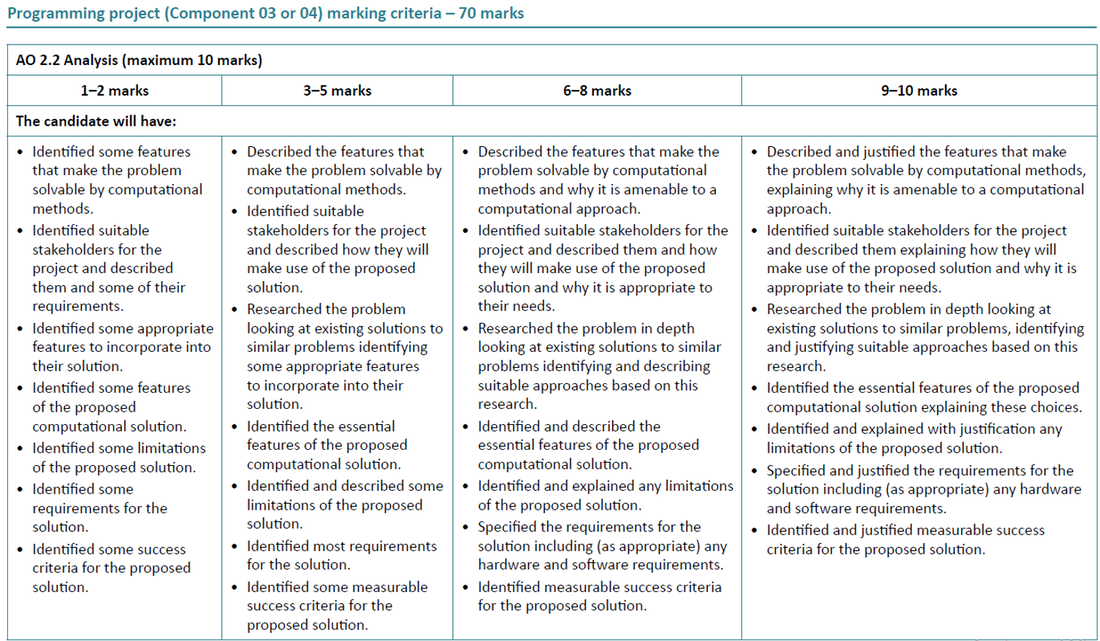
ANALYSIS - 10 marks
The analysis section is a long, wordy narrative report. To gain anything more than the bare minimum marks you must write long explanations and justifications. State the obvious!
At this stage you must write about:
At this stage you must write about:
- Introduce your idea and explain why you think it would be good.
- Identify your stakeholders and explain how they might use your product. How would it benefit them?
- Compare your ideas with existing solutions. What features do other products have that you could include? What features are not so good, what would you do differently?
- Explain why a computational approach is appropriate for your idea ( why would your product work as a computer program)?
- Limitations - explain features that you won't be including and why. This is often because you don't have the time or the skills required are too advanced.
- State the essential features of your product, What should it do from the user's point of view? This can be a bullet point list. But you need to explain why you have decided that these features are essential.
- Measurable Success Criteria - create a bullet pointed list of specific product features. Measurable means that you should be able to create test for these features.
- Hardware and Software Requirements. Justify the software used to run your program ( not create it). Check online for the system requirements for Visual Studio or the program you're using.
Research
You need to decide on which features to include in your product and what to exclude. Carry out the following types of research:
Analyse the results to say what you have found and how this informs your product. What features have you decided you will include. What features would you avoid adding because they are unpopular with your target audience?
- questionnaires
- interviews
- observations
Analyse the results to say what you have found and how this informs your product. What features have you decided you will include. What features would you avoid adding because they are unpopular with your target audience?
Questionnaire
Your questionnaire, interview etc. should help you to justify the features that you have included into your Measurable Success Criteria. For example "90% of those questioned said that they liked [ name the feature]. However only 10% of those questioned wanted [ name of feature] so I have chosen not to include this".
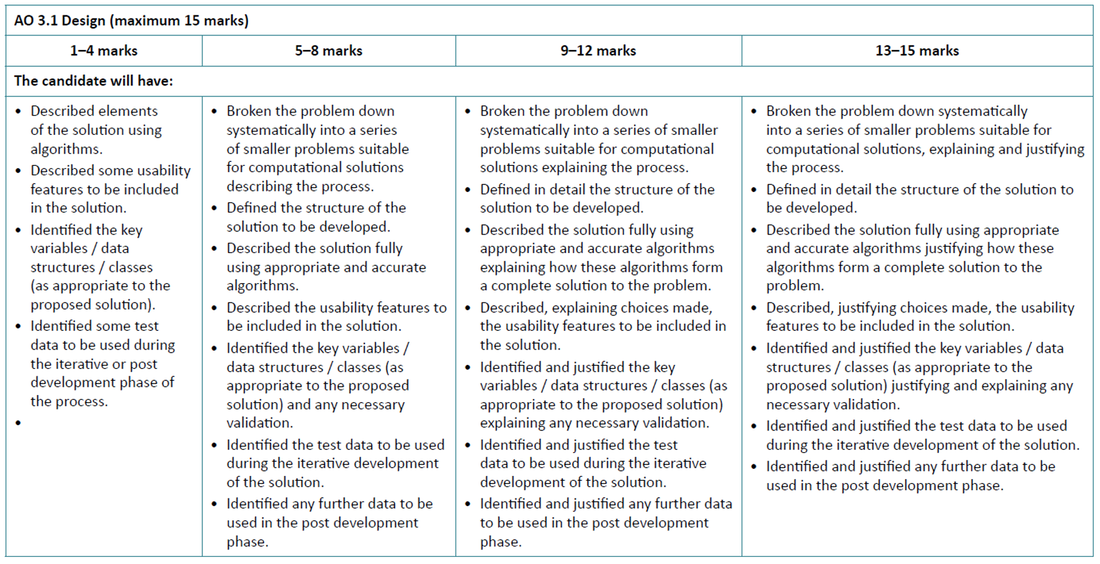
DESIGN - 15 marks
For this section you should have:
- Screen designs - annotated to explain each feature.
- A Top Down Design. Your screen designs will probably help you to work out the first level of this design.
- Pseudo code for each function
- Data structures and key variables.
- Validation ( this could be shown on your screen designs).
- Test Data - This can be a bullet point list. Identify normal data that might be entered into your program. But you also need to predict data that can be entered that could crash your program or make it give inaccurate results ( boundary and non valid data). Note: good validation prevents many of these errors.
Top Down Design
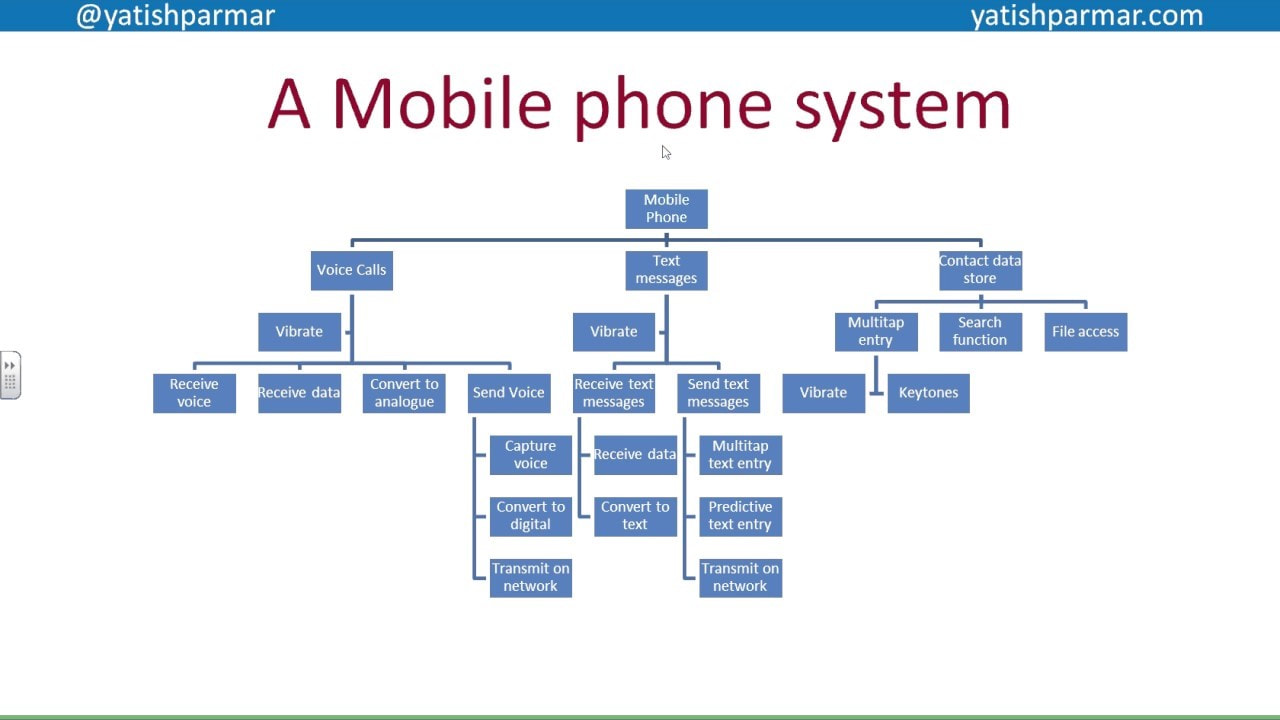
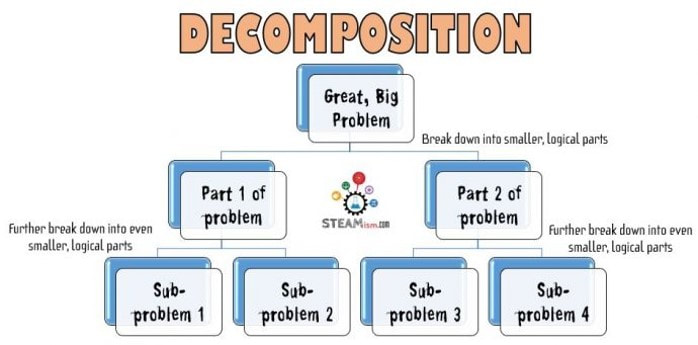
A top-down design breaks down your product into the major steps. Then each major step is further broken down into its main steps. This process is repeated until the step is small enough to be programmed into a function. Programmers call this approach 'decomposition' because you are ‘decomposing’ or breaking down a large problem into smaller problems. In large companies each section may be programmed by a different person.
|
|
Pseudocode
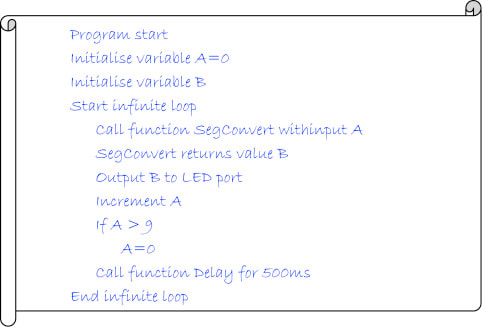
Once you have completed your top-down design, you should be able to turn the bottom row into functions. Programmers often plan out a function by writing pseudocode. Pseudocode is just writing out your algorithm in plain English. You follow the structure of a programmed algorithm, but you don't worry about syntax.
|
|
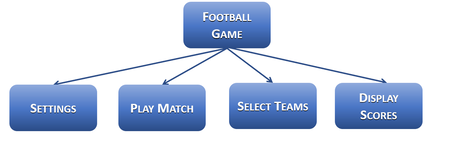
Example: Football Game App
|
Let’s imagine that we are making a game to play football. What are the main sections of a football game that could be programmed separately? We definitely want to be able to play the match. But we also probably want to configure the teams. We are likely to want to see scores for games played. We may also want to change settings for the whole game e.g., mute or play sound effects. Each of the sections here could be programmed by a different programming team.
|
|
|
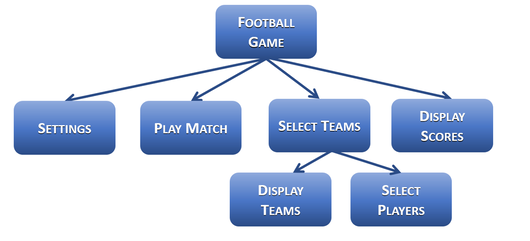
Each main section could be further broken down into its main steps. For example. The section select teams could break down into two main sections: display the teams we already have or change the teams by selecting different players.
|
|
|
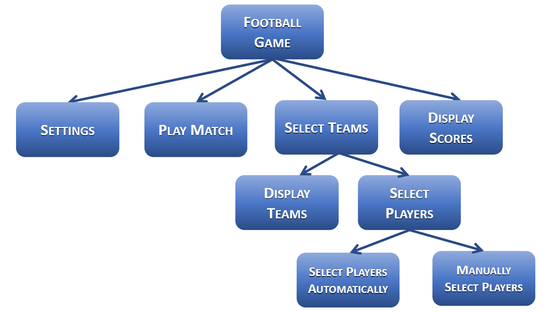
We could further decompose each of the sections above into their main sections. For example, Select Players may break down into two sections: We could have an automatic mode which randomly selects players. Or we could allow users to select players manually.
This example is not complete as we have just decomposed ( broken down) the Select Teams section. To complete would keep breaking each of the main sections into its sub sections. We would continue until we get to a point where we the section is small enough to be written into one function in pseudocode.
|
|
Creating Pseudocode from the Top Down Design
Pseudocode becomes much easier when based on the top-down design because the bottom part of the top-down design should contain sections small enough to be coded into one function. For example, here is the function to select players automatically which is one of the bottom sections of Select Teams. Note that comments are included with the pseudocode.
/* Function: AutoSelectPlayers.
* Parameter Variables: Team – team to change players, AllPlayers: array of all available players
* Purpose: randomly selects and assigns players to the array Team from the array AllPlayers
*/
Function AutoSelectPlayers(AllPlayers, Team )
{
rand = get a random number
loop through each player in the array Team
{
assign to Team the player at position rand in AllPlayers
}
}
We can carry on making all of the functions based on the bottom sections of the top-down design. Once we have all the functions, we can call those functions in the next level up. So PlayerSelection may call AutoSelectPlayers like this:
/* Function: SelectPlayers.
* Parameter Variables: Team – team to change players, AllPlayers: array of all available players
* Purpose: randomly selects and assigns players to the array Team from the array AllPlayers
*/
Function SelectPlayers(AllPlayers)
{
Get the selected team from the Teams list control.
If the Auto radio button is selected set the auto variable to true, otherwise set auto to false.
if( auto)
{
AutoSelectPlayers(AllPlayers, Team )
}
else
{
ManuallySelectPlayers( AllPlayers, Team) // assuming we have written this function too.
}
}
We can keep working up through the design calling the functions below. So the section Select Teams may call SelectPlayers like this.
/* Function: SelectTeams.
* Parameter Variables: Team – choice – the choice that the user has selected which is either to display the list of teams or select players.
* Purpose: randomly selects and assigns players to the array Team from the array AllPlayers
*/
Function SelectTeams(choice)
{
AllPlayers = get array of AllPlayers from file
if( choice == display teams)
{
DisplayTeams( ); // assume this function has been written in pseudocode
}
else if( choice == SelectPlayers )
{
SelectPlayers( AllPlayers)
}
}
If pseudocode is based on the top-down design most of the code will be contained in functions that are called by the next level up.
Note: You report must include a detailed description of your top-down design and pseudocode justifying your approach.
Data Structures
As you write your pseudocode you will find that you are referring to variables and data structures that you will need to store your data. This is likely to be a combination of:
Make sure you give the full details e.g. for a class list the main member variables.
You will get higher marks for using more complex data structures (e.g., lists, 2D arrays, classes and objects, arrays of objects).
You should justify your choice of variables and data structures stating why they are the most efficient choice in terms of time taking to code (classes) or running your code.
Validation
Explain any validation which might be necessary to ensure that data input is sensible. See below for a further explanation.
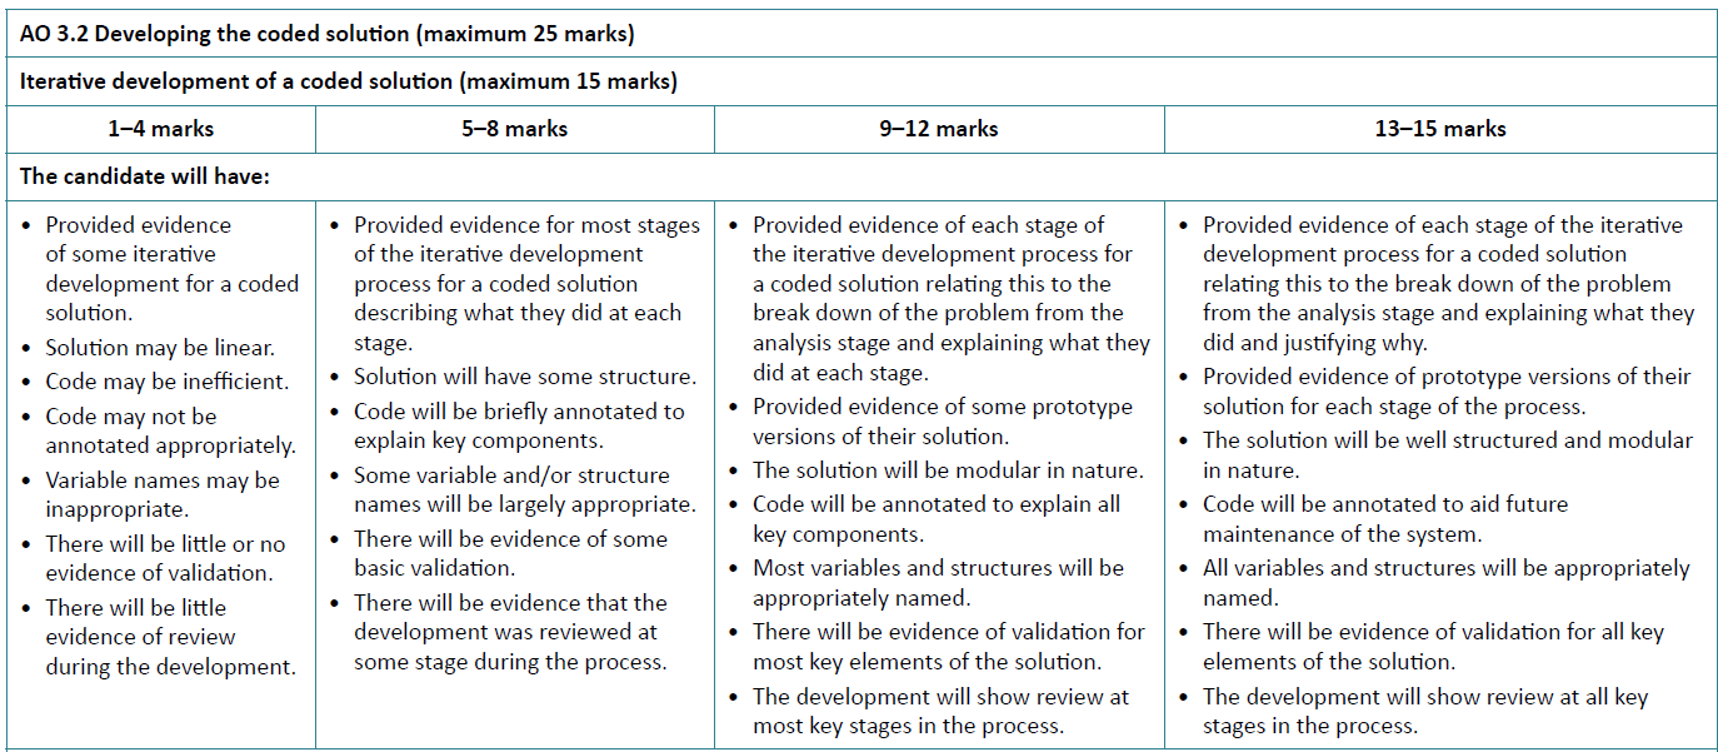
IMPLEMENTATION - 15 marks
Iterative Development - Prototypes
A prototype is often a quickly coded program which may only include the main features of your idea. It gives you a chance to check whether your idea is viable ( will it work as a product?). You also get to demo your program to your stakeholder for feedback. After your first prototype you will then go on to refine your program with a succession of prototypes which include more features. This is called iterative prototyping.
When creating your prototype you should work through the essential features first before implementing other measurable success criteria.
For each prototype you will need to include:
For each prototype you will need to include:
- Screen shots of your program running. These must be annotated to justify the features included from the stakeholders point of view.
- Screen shots of your commented program code. Your write up must justify your approach in terms of elegance and efficiency.
- Feedback from your stakeholder which includes features they liked, improvements suggested and refinements to your program based on the feedback.
- Author Testing: You must author test each prototype (see below).
- Validation; any examples of validation either in the user interface or the code.
Elegant codeProgrammers call code elegant when it is clear and easy to read. Elegant code:
|
Annotate your code - CommentsProgrammers often work in a team. They add comments into their code to explain the code to their fellow programmers. Programmers also comment their code to help them remember the more complex algorithms in the future as often come back to older code and need to understand it. Your teacher had to keep fixing bugs in the first version of her program for the following five years!
|
Justifying your Approach
Your NEA write up should justify your approach to writing your program. You should include at least the following aspects:
- describe and justify your choice of classes, data structures that make your code more efficient and easier to maintain.
- describe and justify functions, iteration and any other algorithms which make your code more efficient and easier to maintain.
- describe where you have future proofed your code by anticipating how it might be used in the future. For example if you have used a list rather than a fixed size array to hold a set of data which could become larger in the future.
- identify anywhere where you can demonstrate efficient use of memory. For example if you pass an object to another class rather than creating a separate copy of the object.
Tutorials and Use of Existing Code: You must source the website etc for any existing code that you have used or adapted e.g. code shown in tutorials, script files.
Validation
You should design your program so that users can only enter valid data. For example, if you have a place to enter an age, the user should not be able to type "grapefruit" or "1003". You can restrict the user's entry by the type of control you use in Visual Studio, You can also program checks for sensible data after the data is entered. Note: you are not verifying that the data is accurate. So, an 18-year-old can type 45 in age as this is still sensible data.
There are many different ways to:
Evidence of Validation:
Please read this website for further information.
There are many different ways to:
- Validate your program so that only sensible data can be entered e.g. password includes a capital letter
- Verify that data is accurate e.g. password matches correct stored password.
Evidence of Validation:
- Controls which will only accept certain data types or certain values e.g. percentage can only be between 0 and 100.
- Code - error checking in your code e.g. if the length of a string is less than 8 display an error message. Make sure your comments explain the validation.
- Testing - clearly state if a test involves checking for valid data ( normal, boundary or erroneous data ). You may also have presence checks ( e.g. has the username been entered?).
Please read this website for further information.
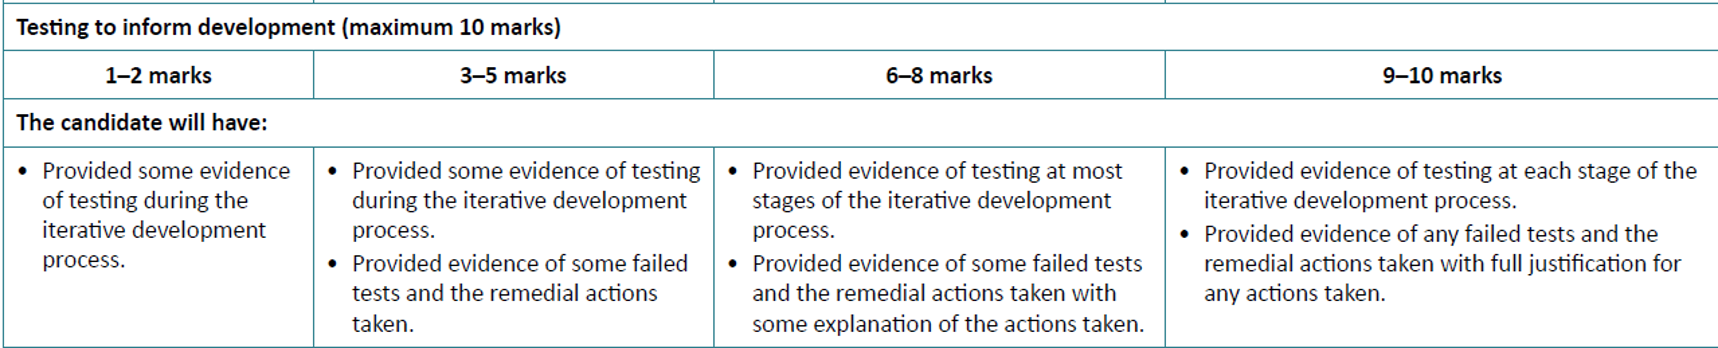
IMPLEMENTATION - ALPHA and BETA TESTING - 10 marks
You must do both ALPHA and BETA testing for each prototype that you create. Do not wait until the end as the testing will inform decisions for the next prototype.
ALPHA TESTING
This is the stage where you test your program as its "author". This is mainly WHITE BOX testing. You know how your program works, so you are testing to check for areas likely to have bugs. All possible routes through the program should also be tested.
BETA TESTING
Beta testing is carried out by your stakeholders after alpha testing has been completed. Feedback from users is used to inform the next stage of development. This is BLACK BOX testing only. This is a form of testing where the software is tested without the testers being aware of how the program works. The test plan traces through inputs and outputs within the software. This is also known as functional testing.
FOR EACH PROTOTYPE:
For each prototype you should produce:
- An ALPHA testing table showing the white box tests that you plan to carry out.
- A BETA testing table showing black box tests that you plan to carry out.
- Screen shot / video evidence showing test results for each test. I would recommend video evidence which can be sent digitally to the examiner. This will provide supporting evidence of your program working.
- Remedial actions is where you fix an error found in your testing. You need to show:
- The failed test in your testing table
- The failed test - screen shot evidence from your program
- The code that you fixed with explanations ( you could show before and after the fix)
- The passed test - screen shot evidence from your program,
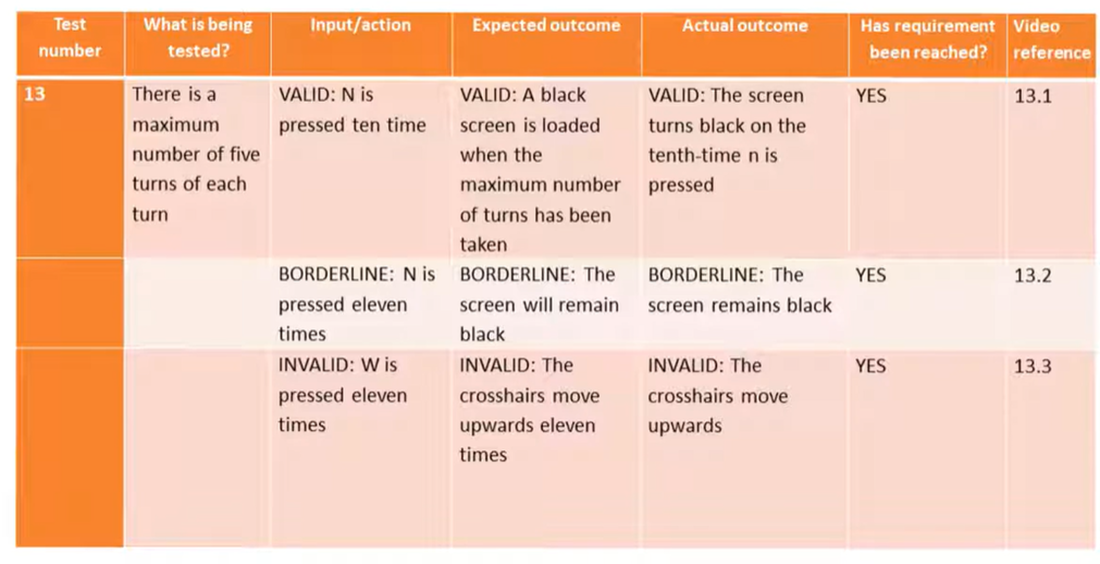
TESTING TABLE EXAMPLE
Below is an example of a testing table from http://computing.outwood.com/NEA/python/testing.html. You can also find out more on BBCBitesize
Below is an example of a testing table from http://computing.outwood.com/NEA/python/testing.html. You can also find out more on BBCBitesize
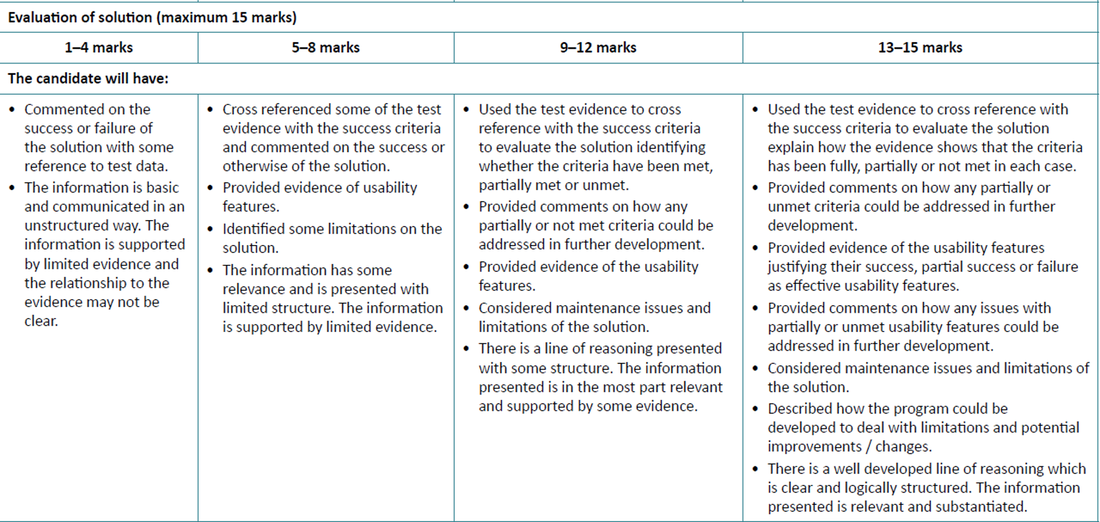
EVALUATION - BETA TESTING - 5 marks
This is the final testing that will help you evaluate the overall success of your product. This is black box BETA testing which should be carried out by your stakeholder. This will allow you to assess your measurable success criteria based on the feedback of your stakeholder. For each criterion you should explain:
- Did you fully / partially / fail to meet the criteria?
- Was this an essential feature? It is more important to meet essential criteria that other criteria.
- If a criterion was not completely met, you must give a specific reason.

EVALUATION - 15 marks
Product Features
In this final stage you will be comparing the product you actually made to your original user requirements as well as the measureable success criteria listed in the analysis stage. You will decide:
- Was the feature implemented? If not, why not?
- You will have demo'd the included features to your stakeholder. From this you can evaluate wether they are fully complete or partially complete.
Maintenance
Describe how easy it would be to update your code in the future. If your code is elegant ( see above), well organised and well commented it will be much easier to change in the future.
Limitations
Here you would need to think about how your product might be used in the future. For example, will any hardcoded data inside your program become out of date? Will new data saved in an external source be able to work with your program without modifications to the code? This is called future proofing.